

Article by
Robert Maxvill
Owner of Aquamax Sprinkler Systems, American Sprinkler Repair and Dallas Drainage Systems.
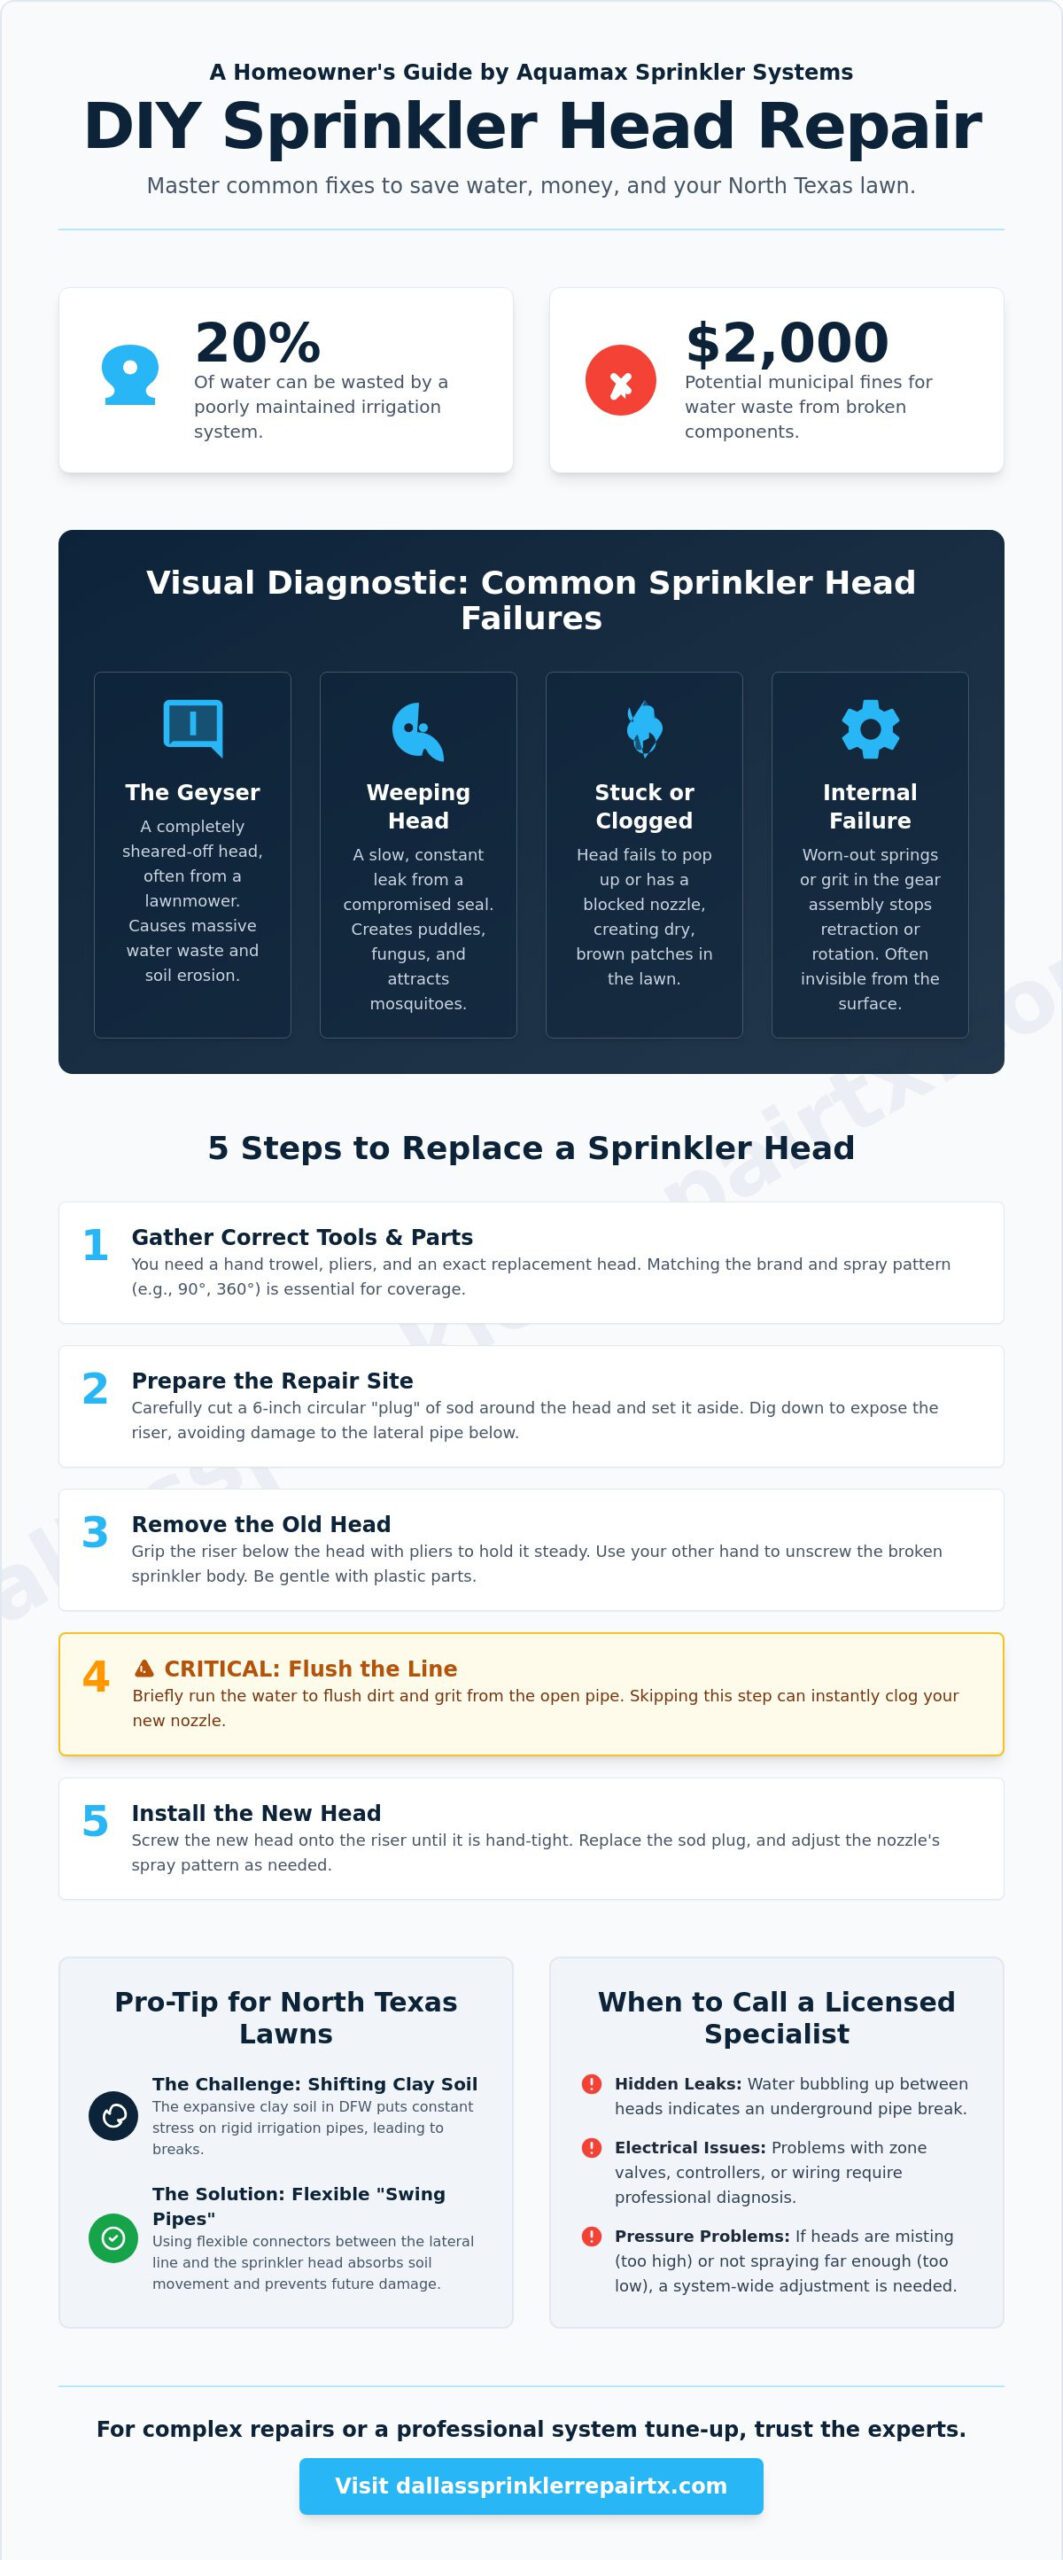
Did you know that a poorly maintained irrigation system can waste 20% of the water it uses? For North Texas homeowners facing strict twice-weekly watering schedules, a single broken component isn’t just an eyesore; it’s a financial drain that can lead to municipal fines up to $2,000. You might be staring at a geyser in your front yard or a stubborn brown patch, wondering if a DIY sprinkler head repair is within your reach or if you’re about to make a costly mistake underground.
It’s stressful to watch your investment wither while water bills climb, especially when the local hardware store offers a confusing array of replacement parts. This 2026 guide simplifies the process, giving you the confidence to identify, troubleshoot, and replace failing components to restore your lawn’s vitality. We’ll walk through the mechanical steps of a proper fix, explain how to avoid breaking lateral pipes, and help you decide when a project is a weekend win or when it’s time to call the licensed specialists at Aquamax Sprinkler Systems for a professional tune-up.
Key Takeaways
- Learn to distinguish between a simple nozzle clog and a “weeping” riser to determine if a full replacement is necessary.
- Follow a professional step-by-step process for sprinkler head repair to ensure your new components match the existing system’s pressure and spray pattern.
- Identify hidden underground leaks that mimic broken heads to avoid digging in the wrong location and damaging your lateral lines.
- Understand how North Texas clay soil shifts your irrigation layout and how to use flexible “swing pipes” to prevent future mechanical failures.
- Recognize when a repair involves complex valve or wiring issues that require the expertise of a licensed irrigation specialist.
Identifying Common Sprinkler Head Failures in North Texas
In the harsh climate of North Texas, irrigation components endure extreme heat and shifting clay soils. Identifying the need for a sprinkler head repair early can save your lawn from dehydration and your wallet from high water bills. Most homeowners first notice a problem when a “geyser” erupts, signaling a head has completely sheared off. This usually happens when a lawnmower blade catches a head that didn’t retract properly, or when a heavy vehicle rolls over a shallow pipe. It’s a high-priority fix that requires immediate attention to prevent soil erosion and massive water waste.
A “weeping” head is a much more deceptive failure. You’ll notice a small, constant puddle around the base of the sprinkler long after the system has shut down. This often indicates a compromised wiper seal or a crack in the body itself. While it doesn’t look as dramatic as a geyser, it’s a steady drain on your resources. It also creates a breeding ground for fungus and mosquitoes, which are common headaches for Dallas residents during the humid summer months. If you don’t address these slow leaks, the constant moisture can eventually lead to localized soil instability.
Visual Signs of a Broken Sprinkler Head
Walk your property while the system is running to spot cracked caps or damaged spray plates. If you see water bubbling from the ground rather than spraying from the nozzle, the connection to the riser is likely broken. You should also look for dry, brown circles in your turf. These patches often appear when a head is “stuck” and fails to pop up, or when the nozzle is so clogged that it only produces a weak trickle instead of a full spray pattern. Don’t assume a brown spot always means you need more water; it often means you need a mechanical fix.
Internal Mechanical Failures
Internal failures are often invisible from the surface. Over time, the internal spring mechanism loses tension, preventing the head from retracting and leaving it vulnerable to foot traffic. North Texas sediment and grit can also migrate into the gear assembly of rotor heads, causing them to stop rotating entirely. Understanding how sprinkler systems work helps you realize that high water pressure is a silent killer of these internal components. Excessive pressure can blow out seals or cause the head to mist, which results in water drifting away in the wind rather than soaking into your soil. For persistent issues, professional irrigation repair is the most reliable way to ensure your system’s longevity and performance.
Step-by-Step Guide to Sprinkler Head Replacement
Before you begin your sprinkler head repair, you must gather the right tools. You will need a sharp hand trowel, a pair of pliers, and the correct replacement head. Do not buy a generic part without checking your existing system first. You must match the brand and the specific spray pattern, such as a 90-degree corner or a 360-degree full circle, to maintain the head-to-head coverage your lawn requires. Using an incompatible head can lead to dry spots or overwatered areas that waste resources.
Preparing the Repair Site
Precision is key when opening the ground. Use your hand trowel to cut a circular “plug” of sod about six inches in diameter around the broken head. Lift the grass and soil out in one piece and set it aside. This technique ensures that your lawn looks undisturbed once the work is finished. Dig down carefully to expose the riser. You must avoid nicking the lateral pipe with your tools, as a punctured pipe is a much more expensive fix than a simple head replacement. Clear all loose dirt away from the base of the head to prevent debris from falling into the system when you open it.
The Replacement Process
Firmly grasp the riser with your pliers to hold it steady while you unscrew the old sprinkler body with your other hand. If the riser is plastic, be gentle; too much force can snap the threads. Once the old head is removed, you must clear the line. The flush step, defined as briefly running the water to eject dirt and rocks from the open pipe before installing the new nozzle, is the most critical part of the process. Even a tiny grain of North Texas sand can instantly clog a new high-efficiency nozzle. You can find more detailed maintenance checklists in this Utah State University Extension maintenance guide to keep your system running smoothly year-round.
Screw the new head onto the riser until it is hand-tight. Avoid using thread sealant unless the manufacturer specifically requires it, as most modern heads feature internal rubber gaskets. Adjust the height so the top of the head sits flush with the soil line. This protects the unit from mower blades while allowing the pop-up mechanism to clear the grass height. Finally, turn on the zone to check for leaks at the base and verify the spray direction. If you find that multiple heads are failing or the pressure seems low, a professional sprinkler system tune-up can identify deeper issues within your main lines.
Troubleshooting Beyond the Surface: Is it the Head or the System?
Before you commit to a full sprinkler head repair, you must determine if the problem is localized to the head or systemic to the zone. Replacing a functional head won’t fix a drop in pressure caused by a failing valve or a punctured line. Start your investigation by examining the “last head on the line”—the one physically furthest from the valve box. If this specific head is struggling to pop up or produces a weak, sputtering spray while others in the zone seem fine, you likely have a leak earlier in the lateral pipe or a zone valve that isn’t opening fully. This methodical approach prevents you from wasting time on parts that aren’t actually broken.
Low Water Pressure vs. Clogged Nozzles
Don’t assume a dry patch always requires a mechanical replacement. A simple clogged nozzle often mimics a total failure. You can test this by swapping the suspect nozzle with a known working one from an adjacent head. If the spray returns to its normal pattern, you’ve saved yourself the trouble of digging. You can often restore performance simply by cleaning the small plastic filter screen tucked inside the riser. This is a common maintenance task for North Texas systems that pull from secondary water sources or those affected by recent utility work. Additionally, you must distinguish between “low head drainage” and an active leak. Low head drainage occurs when water pools briefly at the lowest point of the zone after the cycle ends due to gravity; a constant puddle, however, suggests a valve that isn’t sealing properly.
Underground Leaks and Pipe Damage
If you notice a soggy spot or a depression in the turf between two sprinkler heads, you likely have a sprinkler system leaking underground. These leaks frequently occur at the riser connection rather than the head itself. A cracked riser, often caused by the intense expansion and contraction of North Texas clay soil, can spray water directly into the ground, starving the head of the pressure it needs to pop up. This often looks like a broken head from a distance because the spray is weak, but the actual failure is buried six inches below the surface. Monitoring your utility costs is essential; a high water bill sprinkler leak is often the first warning sign that a main line or lateral pipe has failed out of sight. A successful sprinkler head repair begins with this type of precise diagnosis, ensuring you address the root cause rather than just the visible symptom.
Preventing Future Damage: Maintenance Tips for DFW Homeowners
Maintaining a lush lawn in North Texas requires more than just a functional system; it demands a proactive approach to environmental challenges. Most homeowners view sprinkler head repair as a reactive task, but the most successful irrigation strategies focus on prevention. Prevention saves you money and time. Conducting seasonal tune-ups is the best way to catch small leaks or misaligned nozzles before they escalate into “geysers” that erode your topsoil. By inspecting your zones every spring and fall, you ensure that every drop of water reaches its intended target, keeping your water bills manageable under Dallas’s strict conservation guidelines.
Adjusting for Soil Movement and Clay Expansion
The high clay content in Dallas-Fort Worth soil is a constant threat to irrigation stability. This “Dallas Clay” expands aggressively when wet and contracts during the intense heat of August, causing sprinkler heads to shift, tilt, or sink below the grass line. When a head tilts, it disrupts the spray pattern and creates dry spots that can kill your turf. You shouldn’t ignore a leaning riser. Our deep understanding of these local soil cycles stems from the founding of Aquamax Sprinkler Systems in 1998, providing nearly three decades of regional expertise to our neighbors. To combat this shifting, we recommend using flexible “swing pipes” or “funny pipe” for all head connections. These flexible tubes act as shock absorbers, allowing the head to move with the soil without snapping the rigid lateral pipes underground.
Protecting Heads from Lawn Mowers and Edgers
Mechanical damage from landscaping equipment is the leading cause of broken irrigation components. You can’t always control where a mower goes, but you can control your system’s vulnerability. Following these simple steps will significantly extend the life of your hardware:
- The One-Inch Rule: Set the top of your sprinkler heads exactly one inch below the soil line. This depth allows the pop-up mechanism to clear the grass while keeping the body safely away from spinning mower blades.
- Use Protective Borders: In high-traffic areas or near driveway edges, consider installing concrete “donuts” to provide an extra layer of defense against heavy equipment.
- Monitor Spray Patterns: Regularly adjust your nozzles to keep water off sidewalks and home foundations. Constant moisture near a foundation can lead to costly structural issues in North Texas homes.
If your system seems out of alignment after a rough summer, don’t wait for a total failure to occur. Schedule a professional sprinkler system tune-up to recalibrate your coverage and protect your property’s value.
When to Call a Licensed Dallas Irrigation Specialist
While a single sprinkler head repair is often a straightforward weekend project, certain irrigation symptoms indicate deeper mechanical or electrical failures. If an entire zone refuses to activate, the problem isn’t the head; it’s likely a faulty solenoid or a wiring break between the controller and the valve. Attempting to diagnose these electrical issues without proper equipment can lead to short-circuiting your entire control panel. You should also step back when a repair requires cutting into the main line or the valve manifold. These high-pressure components require precise solvent welding and specific fittings to prevent catastrophic leaks that could wash out your foundation or result in fines up to $2,000 under Dallas watering ordinances.
Complex Valve and Wiring Issues
Identifying why a zone stays dormant involves troubleshooting the solenoid versus the controller. A professional uses a multimeter to check for 24-volt output at the timer and continuity at the valve. DIY electrical work on irrigation timers carries risks, including damaging the delicate circuit boards that manage your watering schedule. If you’ve replaced a head and the zone still lacks pressure, the valve diaphragm might be torn or obstructed by debris. These internal repairs are delicate. They require a clean environment to ensure the valve reseals correctly and maintains the integrity of your system’s pressure.
Why Licensing Matters for Your Home
In Texas, the Texas Commission on Environmental Quality (TCEQ) strictly regulates landscape irrigation. Any professional working on your system must hold a valid license, which requires passing a rigorous exam and paying a $111 fee for application or renewal every three years. Hiring an unlicensed handyman for irrigation repair puts your property at risk. Without proper knowledge of backflow prevention, an improper repair could allow stagnant irrigation water to siphon back into your home’s clean drinking water supply. This is a significant health hazard that licensed specialists are trained to prevent.
Aquamax Sprinkler Systems ensures every technician understands the specific water regulations in Dallas and Plano, keeping your property in full compliance with local laws. Professional service saves you money in the long run by eliminating the “trial and error” costs associated with DIY fixes. A comprehensive sprinkler system tune-up provides the peace of mind that your system is legal, efficient, and calibrated for the unique North Texas climate. Don’t let a small mechanical issue turn into a major liability; call a seasoned expert when the job moves beyond the surface.
Take Control of Your North Texas Irrigation Today
Restoring your lawn’s efficiency starts with a precise diagnosis. You now know how to distinguish between a simple nozzle adjustment and a complex mechanical failure. By implementing preventative measures like the “one-inch rule” for head depth and using flexible swing pipes to combat shifting clay, you’ve taken the first steps toward a more resilient landscape. Mastering a basic sprinkler head repair not only saves water but also protects your investment against the harsh Texas summer. It’s about more than just a mechanical fix; it’s about maintaining the vitality of your property.
If your troubleshooting reveals deeper issues with your valves, wiring, or main lines, don’t risk your property’s safety with unlicensed work. Since 1998, Aquamax has served the DFW area with A+ rated local expertise and a team of licensed, insured technicians who understand our unique environmental challenges. We’re here to handle the heavy lifting so you can enjoy a lush, stress-free lawn. Schedule your professional sprinkler repair with Aquamax today! Your vibrant, leak-free landscape is well within reach.
Frequently Asked Questions
How much does it cost to replace a single sprinkler head in 2026?
Professional replacement costs depend on the complexity of the repair and the type of component needed. Factors such as the depth of the burial, the need for a new riser, and the specific brand of rotor or spray head will influence the final investment. While basic heads are affordable, labor rates for licensed irrigators reflect the expertise required to ensure your system remains compliant with Texas state regulations.
Can I replace a sprinkler head myself without digging?
You can often replace the internal assembly without digging if the outer casing remains intact. This process involves unscrewing the top cap and inserting the internal components of an identical model. It is a clean way to handle a sprinkler head repair without disturbing your lawn. If the leak is at the base or the body is cracked, you will need to excavate to reach the riser connection.
Why is my sprinkler head leaking even when the system is off?
Constant leaking when the system is off typically points to a failing zone valve. If water pools at the head for hours, the valve’s internal diaphragm is likely worn or trapped open by a small stone. This allows a steady trickle of water to bypass the seal. If the water stops shortly after the cycle ends, it is likely just low head drainage caused by gravity.
How do I know what brand of replacement sprinkler head to buy?
Identify the brand by checking the logo or model name stamped on the top of the sprinkler cap. It’s essential to use the same brand and model if you’re only replacing internal parts. If you’re replacing the entire unit, you can choose a different manufacturer as long as the spray radius and precipitation rate match the other heads in that specific zone.
What is the difference between a pop-up spray head and a rotor head?
The primary difference lies in how they distribute water and the distance they cover. Pop-up spray heads emit a continuous fan of water and are best for small, intricate areas. Rotor heads use one or more rotating streams to cover large expanses of turf. Rotors are generally more efficient for North Texas lawns because their slower application rate allows our dense clay soil to absorb water more effectively.
How long do sprinkler heads typically last in North Texas soil?
Sprinkler heads in our region typically last 10 to 15 years with proper care. However, the aggressive expansion and contraction of North Texas clay soil can cause mechanical stress that leads to earlier failures. Environmental factors like high mineral content in the water or accidental damage from lawn equipment also play a role. Regular tune-ups help extend the life of these components significantly.
Why is my new sprinkler head not popping up all the way?
A failure to pop up usually indicates a lack of water pressure or a compromised wiper seal. Check the zone for other leaks that might be diverting pressure away from the head. If the rest of the zone is fine, grit may be jammed in the riser assembly. You can often fix this by cleaning the seal or performing a sprinkler head repair to replace the internal spring.
Can a broken sprinkler head cause low pressure in the rest of the zone?
A broken head acts as a massive leak that drains pressure from the entire irrigation zone. When a head is missing or sheared off, the volume of water escaping at that point prevents the system from building enough backpressure to lift the other heads. This results in poor coverage across the entire lawn. Replacing the broken head is the only way to restore the zone’s hydraulic balance.
