

Article by
Robert Maxvill
Owner of Aquamax Sprinkler Systems, American Sprinkler Repair and Dallas Drainage Systems.
What if the success of your new lawn was decided before the first piece of grass even touched the ground? In North Texas, a beautiful yard is a result of careful engineering rather than luck. Most homeowners in the Dallas area understand the frustration of watching expensive grass struggle against our stubborn, compacted clay soil. Learning how to prepare yard for sod is the only way to overcome these local challenges. It is a common fear that the summer heat will destroy your investment before the roots take hold, but proper preparation ensures your landscape is built to last.
This guide provides a definitive checklist tailored to our unique environment and strict municipal watering schedules. We will walk you through the essential steps of soil amendment, grading, and the critical task of ensuring your sprinkler system is fully functional before the pallets arrive. You will learn how to handle the heavy lifting of soil prep and when to call in a professional for irrigation repairs or drainage solutions. By following this roadmap, you’ll gain the confidence to transform hard Dallas dirt into a thriving foundation for a lush, deep-rooted lawn that survives the toughest Texas summers.
Key Takeaways
- Understand why instant root-to-soil contact is the biological foundation for a healthy lawn and how site prep prevents transplant shock in the Texas heat.
- Learn the specific steps for removing old turf and tilling compacted Dallas clay to a six-inch depth to create a hospitable environment for new roots.
- Discover why the bare-dirt phase is the most efficient time to master how to prepare yard for sod by auditing your irrigation and drainage systems.
- Identify the best soil amendments for North Texas, such as expanded shale and organic compost, to improve drainage and ensure long-term vitality.
- Master the final pre-installation checklist, including the crucial step of re-moistening the soil to prevent it from wicking moisture away from your new sod.
The Foundation of a Lush Lawn: Why Proper Site Preparation is Non-Negotiable
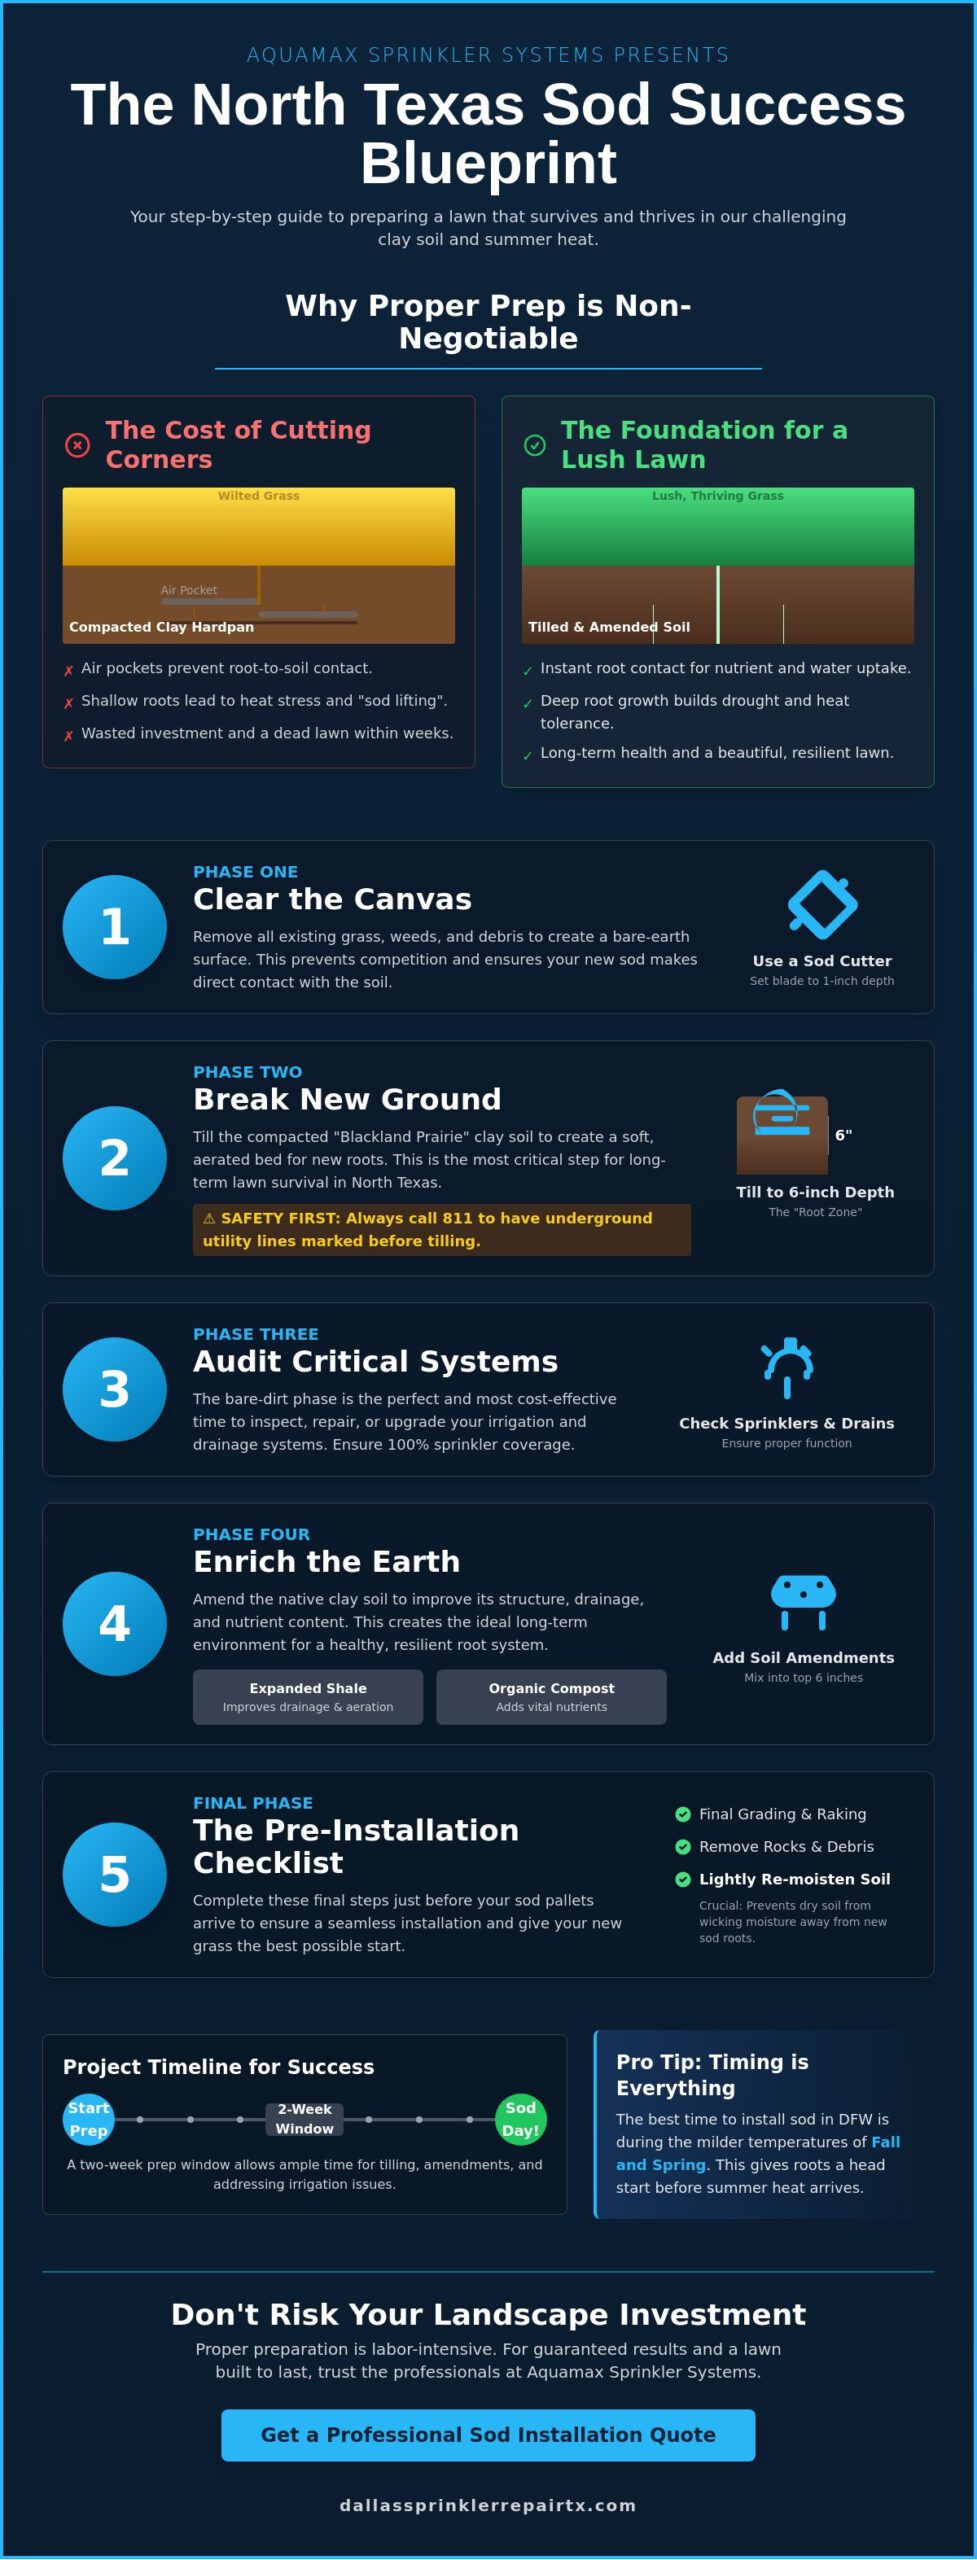
New sod is not just a green carpet for your property; it’s a living system of roots and soil that must fuse with your yard’s existing earth. To understand what is sod, you must view it as a biological organism that requires an immediate connection to the ground to survive. This instant root-to-soil contact is the only way the grass can draw the moisture and nutrients it needs. In North Texas, our environmental conditions are notoriously unforgiving. When summer temperatures climb above 100 degrees, the margin for error disappears. Without a properly prepared surface, the sod’s roots hit a wall of hard clay, dry out, and perish within days. Thorough prep work is the only insurance policy for your landscape investment.
Mastering how to prepare yard for sod involves a methodical, multi-step engineering process. It isn’t a simple weekend task of clearing away old weeds. It requires a strategic combination of clearing debris, tilling to break up heavy compaction, and auditing your underground systems. In 2026, regional lawn health focuses heavily on the “root zone.” This is the top six inches of soil where the majority of biological activity and water storage occurs. If this zone is shallow or restricted by hardpan clay, your grass will never develop the deep root structure needed to survive a North Texas drought. You are building a foundation, not just a surface.
The Cost of Cutting Corners on Prep
Skipping the preparation phase is the fastest way to waste your money. Poorly leveled yards often harbor hidden air pockets beneath the turf. These pockets act as insulators, preventing the delicate new roots from reaching the cool, moist soil they need to thrive. This often results in “sod lifting,” where the grass fails to knit to the ground and eventually dies. Compacted soil is another silent killer. It forces roots to remain near the surface, making the lawn incredibly sensitive to heat stress. Learning how to prepare yard for sod correctly will save you thousands in potential replacement costs by ensuring the grass survives its first critical month. While professional sod installation involves labor-intensive prep, it is far more cost-effective than replacing a failed lawn because the ground wasn’t ready.
Setting Your Timeline for Success
Efficiency starts with a clear schedule. Establish at least a two-week preparation window before your sod is scheduled to arrive. This timeframe allows you to complete multiple soil passes and address any irrigation issues discovered during your initial audit. Timing your project is critical for long-term vitality. You should coordinate your efforts with the best time to install sod in Texas to ensure the roots have a head start. Fall and spring are the preferred windows for DFW prep because these seasons offer the mild temperatures and consistent rainfall necessary for rapid root establishment.
Clearing the Canvas: Removing Old Turf and Managing Soil Compaction
Before you lay down a single square of new grass, you must clear the area of all existing vegetation. You cannot simply lay new sod over old grass or weeds; the existing plants will compete for nutrients and create an uneven surface that prevents root contact. Renting a motorized sod cutter is the most efficient way to handle this step. Set the blade to a depth of about one inch to strip away the old turf and its immediate root system. This creates the smooth, bare-earth canvas required for a successful installation. Knowing how to prepare yard for sod starts with this aggressive removal of the old to make room for the new.
North Texas is notorious for its “Blackland Prairie” clay. This soil type is incredibly dense and prone to extreme compaction. Over time, a “hardpan” layer can form, which is a nearly impenetrable shelf of soil that blocks water and air from reaching deeper levels. If you don’t break this layer, your new sod will likely suffer from “wet feet” or drought stress because water cannot drain or penetrate. Before you begin tilling, you must prioritize safety. Call 811 to have your underground utility lines marked. Striking a buried gas or power line is a dangerous and expensive mistake that can be easily avoided with a simple phone call.
Eliminating Weeds and Invasive Grasses
Mechanical removal with a sod cutter is superior to chemical clearing because it physically removes the weed seed bank. Invasive species like Bermuda grass and Nutgrass are particularly aggressive in Dallas. They often have deep rhizomes that survive a surface-level clearing. If your yard was heavily infested, you might need to apply a non-residual herbicide after the initial clearing. Ensure any chemical you use is labeled as “non-residual” so it doesn’t linger and harm your new turf. For more detailed insights on species-specific establishment, the Texas A&M AgriLife Extension guide offers excellent regional data on managing invasive varieties during the transition.
The Tilling Process for Heavy Clay Soil
To break up Dallas clay, you need the right equipment. A front-tine tiller will likely bounce off our hard-packed earth. Use a heavy-duty, rear-tine tiller instead. It provides the torque necessary to reach a full 6-inch depth. A professional tip for 2026 is to water your yard deeply 48 hours before tilling. This softens the clay just enough to allow the blades to bite without turning the yard into a mud pit. Till in a cross-hatch pattern, moving north-to-south and then east-to-west. This ensures every inch of the “root zone” is aerated and loose. If the labor of tilling and clearing feels overwhelming, our team provides professional sod installation services that handle every step of this heavy preparation for you.
The Critical Middle Step: Auditing Irrigation and Drainage Systems
Once you’ve cleared the old turf and tilled the soil, you’ve reached the most important window of the entire project. This “bare dirt” phase is the only time you can access your underground infrastructure without destroying your new lawn. If you wait until the grass is laid to realize a zone isn’t firing or a pipe is leaking, you’ll be forced to cut into your brand-new investment. Mastering how to prepare yard for sod requires a shift in focus from the soil to the systems beneath it. You must ensure your irrigation provides 100% head-to-head coverage, meaning the spray from one head reaches the base of the next. Any dry spots during the first 14 days will result in permanent sod failure.
You also need to account for the physical profile of the sod itself. Most North Texas sod arrives with a one-to-two-inch thick layer of soil and thatch. If your sprinkler heads are currently flush with the bare dirt, they will be buried once the sod is installed. This leads to “clipping” the spray pattern and localized flooding around the head. Take the time now to adjust your sprinkler head heights so they sit slightly above the expected finished grade. This simple mechanical adjustment ensures the water clears the grass blades and reaches the intended target.
The 2026 Irrigation Efficiency Audit
Run every zone and look for broken sprinkler heads or clogged nozzles that may have been damaged during the tilling process. In 2026, North Texas municipalities have tightened water restrictions, generally prohibiting sprinkler use between 10 a.m. and 6 p.m. from April through October. To maximize your limited watering windows, consider upgrading to high-efficiency rotary nozzles. These nozzles deliver larger water droplets that resist wind drift and evaporation. Finally, ensure your smart sprinkler controller is programmed for the “establishment phase.” New sod requires multiple short watering cycles throughout the day to keep the root zone moist without causing runoff.
Addressing Grading and Drainage Issues
Before the first roll of grass is laid, you must verify that your yard’s slope directs water away from your home’s foundation. Use a string level or a simple transit to identify low spots where water might pool. Standing water is a death sentence for new sod, as it leads to root rot and fungal outbreaks. If you discover areas that remain soggy, you should integrate yard drainage solutions like French drains or catch basins now. Aim for a 1-2% slope away from all structures. Correcting these grading issues during the prep phase is significantly easier and more effective than trying to patch a drainage problem after the lawn is established.
Soil Enrichment and Final Grading: Creating the Perfect Bed for New Roots
After you’ve broken up the heavy Dallas clay, the next phase is to transform that raw earth into a nutrient-rich environment. Raw clay lacks the porosity needed for rapid root penetration. Understanding how to prepare yard for sod requires more than just loosening the dirt; you must actively improve the soil’s structure. Adding organic compost or expanded shale is a professional standard in North Texas. Expanded shale is particularly effective here because it permanently opens up the clay, allowing air and water to reach the root zone even during the peak of a Texas summer. This step ensures your new lawn doesn’t just sit on top of the ground but thrives deep within it.
Applying a high-phosphorus starter fertilizer is another non-negotiable step in the preparation process. While established lawns need nitrogen for green growth, new sod needs phosphorus to trigger immediate root development. Spread the fertilizer evenly across the prepared soil just before the sod arrives. Once the soil is amended and fertilized, you must settle the earth. Use a water-filled lawn roller to lightly firm the surface. This prevents the soil from settling unevenly later, which would create a bumpy lawn that’s difficult to mow and prone to scalping.
Amending North Texas Soil
For most DFW properties, you should mix approximately one to two inches of high-quality organic compost into the top four inches of your tilled soil. This adds vital microorganisms that help the grass resist disease. Before you finalize your mix, conduct a soil pH test. Most Texas turf varieties prefer a pH between 6.0 and 7.0. If your soil is too alkaline, which is common in our region, you may need to add sulfur. When you need extra volume to fill low spots or level the yard, always use “sandy loam” topsoil. It’s the preferred filler in North Texas because it provides excellent drainage and is easy to grade compared to heavy local clay.
Mastering the Final Grade
A professional finish depends entirely on your work with a landscape rake. Use the rake to remove any remaining rocks, large clay clods, or debris larger than a golf ball. These obstructions create air pockets that kill sod roots. As you smooth the surface, ensure the soil level sits exactly one inch below your paved surfaces, such as driveways and walkways. This accounts for the thickness of the sod’s own soil layer, ensuring the finished grass is flush with the concrete. Finally, perform the “footprint test.” Walk across the yard; your shoes should sink no more than half an inch. If you sink deeper, the soil is too loose and needs more rolling. If you leave no mark at all, the soil is too compacted and needs light raking. If you want to ensure your site is perfectly engineered for growth, our team offers professional sod installation that includes expert soil amendment and precision grading.
Your Pre-Installation Checklist: Final Steps Before the Sod Arrives
The heavy labor of tilling and grading is complete, but the final 24 hours are critical for the survival of your investment. One of the most overlooked steps in how to prepare yard for sod is pre-moistening the soil. If you lay fresh sod on bone-dry North Texas dirt, the ground will act like a sponge, wicking vital moisture away from the delicate new roots. Lightly water your prepared area the evening before delivery to ensure the soil is damp but not muddy. This creates a cool, receptive environment for the grass to begin its establishment immediately upon contact. Finalizing how to prepare yard for sod means ensuring your irrigation zones are ready to fire as soon as the first pallet is empty.
Logistics are just as important as biology. Identify a staging area for your pallets that minimizes the distance you’ll have to carry individual pieces of sod. Fresh sod is heavy and dries out quickly once it’s on the pallet. Have your tools ready and staged: sharp sod knives for trimming around curves, garden hoses for immediate spot-watering, and a lawn roller to press the grass into the dirt once laid. If you are managing a large acreage or a property with complex slopes, transitioning to professional sod installation is often the most reliable way to ensure the job is finished before the grass begins to overheat on the pallets.
The 24-Hour Countdown
Confirm your delivery window with your North Texas sod farm at least 24 hours in advance. Perform a final walk-through of your tilled dirt to pull any opportunistic weeds that may have sprouted since your last pass. It’s also vital to check the local weather forecast. In 2026, we’ve seen more frequent extreme heat events and sudden spring downpours. If heavy rain is expected, you may need to delay delivery to avoid rutting your perfectly graded soil. If extreme heat is predicted, plan to have extra help on site to get the grass in the ground as fast as possible.
When to Call the Pros
While many homeowners enjoy the challenge of DIY prep, some projects exceed the limits of a weekend warrior. If your yard requires significant grade changes or if you are struggling with a failing irrigation system, a “turnkey” solution is often safer. Choosing a partner for new sod installation and irrigation tuning ensures that every variable is controlled by experts. We specialize in integrating drainage, irrigation, and sod into a single, cohesive system. This comprehensive approach provides the peace of mind that your new lawn is backed by professional engineering and local expertise.
Start Building Your Resilient North Texas Landscape
Your new lawn is only as strong as the ground beneath it. By breaking up heavy Dallas clay, enriching the soil with organic amendments, and auditing your irrigation system during the bare-dirt phase, you’ve engineered a landscape built for longevity. These essential steps ensure your investment doesn’t just survive the initial transplant phase but thrives through the intense Texas sun. Mastering how to prepare yard for sod is a labor-intensive process, but the results of a deep-rooted, lush lawn are worth the effort.
If the scope of tilling, grading, and system auditing feels overwhelming, you don’t have to handle it alone. Since 1998, we have served homeowners in Dallas, Plano, and McKinney as licensed irrigation specialists. With an A+ BBB rating and decades of local expertise, we provide the precision needed for a perfect installation. Get a Professional Sod Prep and Installation Quote from Aquamax today. You are now ready to transform your property into a vibrant, resilient outdoor space that adds value and beauty to your home for years to come.
Frequently Asked Questions
Do I really need to till the ground before laying sod in Dallas?
Yes, tilling is essential in Dallas to break up the dense, compacted clay soil common to our region. Without tilling, the soil remains too hard for new roots to penetrate, which often leads to sod failure during the first summer. Tilling creates the necessary pore space for air and water to reach the root zone. This is a foundational step in learning how to prepare yard for sod successfully.
Should I put fertilizer down before or after I lay the new sod?
You should apply a high-phosphorus starter fertilizer directly to the prepared soil immediately before the sod arrives. This placement ensures the nutrients are in direct contact with the new roots as they begin to establish. Applying fertilizer on top of the grass after installation is less efficient because the granules can get trapped in the blades and thatch, delaying nutrient absorption.
How deep should I till the soil for new grass roots?
You should till the soil to a depth of four to six inches. This depth provides a sufficient volume of loose earth for the roots to grow deep enough to survive North Texas droughts. A shallow root system is much more susceptible to heat stress and requires more frequent watering. Deep tilling ensures your lawn remains resilient even under strict municipal watering restrictions.
Can I lay new sod over my existing dead grass?
No, you must remove all existing dead grass and weeds before installing new turf. Laying sod over old vegetation creates a barrier that prevents the new roots from knitting into the soil. This often results in air pockets that dry out the sod and cause it to die. Use a motorized sod cutter to strip the area down to bare, clean earth for the best results.
How much topsoil do I need to add before laying sod?
Most North Texas properties benefit from adding one to two inches of sandy loam topsoil or organic compost. This amendment improves the drainage of the underlying clay and provides a nutrient-rich environment for the grass. When you are determining how to prepare yard for sod, using this extra layer helps you achieve a perfectly level surface while addressing the specific nutritional deficiencies found in local dirt.
What is the best way to level a yard for sod installation?
The most effective method is using a heavy-duty landscape rake to smooth out high spots and fill in low areas with sandy loam. Once the yard appears level, use a water-filled lawn roller to settle the soil. This prevents the ground from sinking unevenly after the first few waterings. A firm, level base is the only way to ensure a smooth, carpet-like finish for your new lawn.
How long can sod stay on the pallet before it needs to be laid?
Sod should be installed within 24 hours of delivery to prevent “pallet burn” or fermentation. In the intense North Texas heat, the grass in the center of the pallet can overheat and die very quickly. If you cannot finish the installation in one day, move the remaining pallets into a shaded area and keep the exposed edges of the sod moist with a light mist.
Should I water the bare dirt before the sod arrives?
Yes, you should lightly moisten the bare soil approximately 24 hours before your sod delivery. Damp soil is significantly cooler than dry earth and prevents the ground from wicking moisture away from the fresh sod roots. Avoid overwatering to the point of creating mud, as this will cause ruts and uneven surfaces when you begin walking on the soil to lay the grass.
